Understanding camera histograms and the importance of shooting to the right
The histogram is a tool included in most DLSR cameras and photo editing software which at a basic level shows you a graph of the range on tones throughout your photograph. The histogram shows you the brightness values in your photographs and shows you how many pixels there are of each brightness level throughout the entire frame. Learning to read and use the camera histogram is vital if you are going to be successful with your manual exposure landscape photography and be able to get the most out of the scene in front of you. Reading a camera histogram can take some practice but it will in the long run improve your landscape photography.
The histogram is made up of roughly three zones: shadows, mid tones and highlights. The aim is to create an evenly spread histogram throughout the whole range of brightness values, this can be done in camera by setting a good even exposure or optimised afterwards in your image processing software. If the histogram is bunched to the left you have captured an image full of deep shadows which may mean and underexposed image where there are areas of pure black rather than shadow detail. Bunched in the middle would mean that you have very little shadow detail or highlights leaving a very flat image. Peaks bunched over to the right is an image missing any of the vital shadow details which make landscape photographs so attractive. If the histogram has a peak on the left this means that you have completely lost some of the detail in the shadows if over to the right means you have blown and will not be able to recover the highlights.

The term 'Shooting to the right' gets thrown around photography forums usually without any kind of information or guidelines showing what this actually is and why it is such a great thing to know. The technique of shooting to the right is incredibly useful when you are hoping to get the absolutely best quality in the RAW file, what people tend to miss is the fact that you will always need to post process the files that you have captured to bring back to contrast and finer details in the shot without adding any extra noise, it is far easier and better to add contrast than it is to try and take it away from an underexposed photograph. When I first learned about this technique I was amazed at the amount of detail I could include in the shadows with relatively little noise.
The main reason to use the shooting to the right camera technique is to obtain maximum quality in the RAW file, the reason for this is due to the way that a camera sensor captures the light. In very basic terms the camera CCD or CMOS sensor is much better at capturing brighter light, this is highlighted by the fact that you will most frequently notice noise in the shadows of the image. By exposing to the right you are capturing all of the detail in the best performing part of the sensor. You will need to shoot in RAW for this to work as you will need to process all of the images to add the shadows and contrast back into the picture in the digital darkroom.
Out in the field you will need to practice shooting images with the histogram over to the right rather than a traditional evenly exposed balanced photographs. The way I tend to do this is meter the scene to find out the usual optimal exposure and use any necessary graduated filters and then take a shot with a normal balanced exposure. I will then check the histogram of this shot on the camera LCD screen to see how the histogram appears. Depending on the spread of tones I will then increase the exposure to a point just before the highlights begin to clip and then re-shoot the scene with the second exposure with the histogram firmly over to the right, this is the exposure that I will process later back on the computer. It is important to remember that whilst you are aiming for a histogram with the majority of values over to the right under no circumstances should any of the highlight be clipped as there is no way to add these back in afterwards, you will need to try a few exposures to get to a level where you have a histogram on the right but you have not included any values in the clipped section.
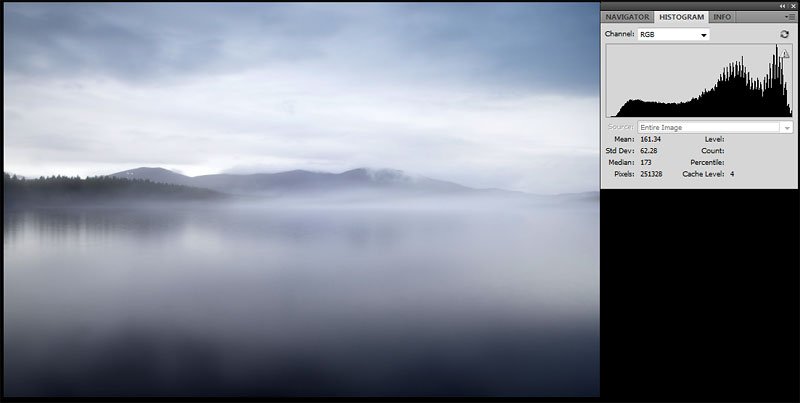
One of the easiest examples of shooting to the right is a recent shot from the shore of Loch Garten which was taken on a rainy afternoon so the light levels were very even and balanced. I deliberately pushed the exposure to the right as you can see in the image below so that I could capture as much detail in the rain gloom as possible. In the post processing stage I was able to bring back all of the shadow detail and add the drama to the scene by bringing in the levels so that they touched each end of the histogram. This has resulted in an image full of drama but also technically very clean and noise free with a histogram that is nicely balanced throughout the tonal range, you can see that the histogram is the exact same shape in both images but in the second image there is far more contrast as the tones are nicely distributed throughout the tonal range.

There are scenes where this technique would not be suitable; the scenes where I have found this to be most effective are subjects like long exposure seascapes, landscape scenes on misty days and also architecture photography at night where you can capture all kinds of details in the usually deep shadows without introducing any digital noise. If you are looking at a particular style of shot you may aim to have all the values in the shadow range if you have a moody night picture or at the other end of the scale all histogram tones over to the right if you are looking at a high key minimalist landscape photograph.
In my photographs I have become over the years quite dedicated to producing the best quality images possible from my relatively modest camera and lens set up. I'm often told that I should upgrade to the latest pro camera models and spend thousands of pounds on lenses and filters to have a chance of producing good quality sharp photographs. I have compared some of my full resolution images to those from photographs taken with pro specification cameras and the results are near identical if not better in some cases (although obviously only at a modest 16 megapixels). I have seen images which lack the quality when you look at them closely, this is mainly due to sloppy processing techniques but that can be a topic for another blog - why somebody would spend thousands on the best camera & lenses and then ruin their photographs in Photoshop is beyond me!